Showing posts with label Before and After. Show all posts

Friday, July 3, 2015

Paint it Black: Defining an Entryway Door With Paint

Sometimes I wonder how many Pinterest projects I am away from my perfect house ... it's probably somewhere around infinity plus one.   As you get to know a house, you begin to see how it's really going to be used, as opposed to how you think it's going to be used, and it's fun to see that evolve.  Then there are projects that so fully insinuate themselves on your psyche that you don't see the undone reality anymore.  One of those projects for me has been our entry way, and after finally opening and actually using the can of paint I bought months ago, the dream of a defined entry way is now - well, real :o)

Our front door opens right into our TV room, which I'm not really crazy about.  If I had it to do over again, I would build a house with a formal foyer.  Long on my list of home decor improvements has been to define our entry way more dramatically.  We started that definition with the Hemnes sofa table from Ikea (click }here{ to see it on the Ikea website), and that helps separate the entry area from the TV room.  It also gives everyone a place to put all their stuff as they come in the door.  The bottom cubbies are perfect for shoes, which wasn't my House Beautiful plan, but I had to concede to functionality on that one.  Four kids, four cubbies - this was a losing battle.  It isn't lovely, but it works better than a jumble of shoes on the floor by the front door.  
We upgraded the entry light fixture two years ago.  Initially, it was a standard flush to the ceiling light, and the change to an Allen & Roth chandelier adds just the right amount of sparkle.  It adds more than just illumination - the shadows that it casts in the room are lovely, too.

Last Friday, with the weekend stretching luxuriantly empty before me, I knew must paint.  I had an itch to paint so badly that I disregarded my research, blew off the possible mistakes, bothered not to change clothes, and refused to acknowledge I didn't have all the supplies I needed, because I absolutely, positively had to paint.  Anything would do, but with the paint and (most of) the supplies to transform the front door sitting right there, the mission was clear.


I used Sherwin Williams Black Magic (click }here{ to see it on their website) in semi-gloss enamel.  I had most of the supplies I needed, except for painter's tape, but that didn't stop me.  I don't necessarily recommend going in on a paint project without painter's tape, unless you find yourself  facing an undeniable urge to paint, and paint this very minute,  r i g h t   n o w.  If that's where you are, you have no choice but to give in to it, I understand completely!

Here is our entry before, with white doors and few accessories:


And ta-da!  Here is the after:


I began with painting the front door, and that was really all I planned to do.  But, as always when I get a paintbrush in my hand, as soon as the first item has a fresh coat of paint, all I can think is, "I must paint ALL the things!!!"  It was inevitable that the office doors were next - they were irresistible.  The front door covered nicely with two coats of paint, but the office doors required a third coat since after the second coat it was still a little patchy.  


LtDan was instantly on board (he gets me - one of the many reasons why I love him), but the kids ... oh, the kids.  First, they were speechless, and then came the questions.

"Oh.  You're painting it ... black?"
"Are you going to leave it like that?"
"MOM!  What are you doing?"
"Have you ever ... you know ... seen anything like this before?"

Obviously, they are not acquainted with Pinterest.

Next to go under the brush was the stair rail.  


And what the heck, the spindles and base, too.
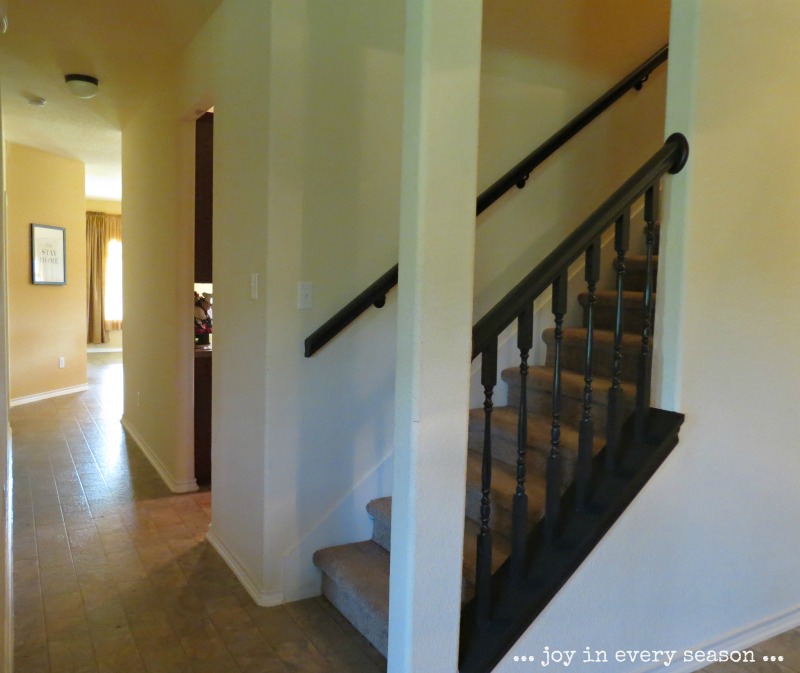

With the front door, the office doors, and the stairway rail and banister transformed, I wasn't done, I was inspired.  Who wants to stop now?  Not me, that's for sure.


The back door was next.


The black pops out, it blends in with the room as a whole far better than the white did, and the door seems more substantial in black.  Also:  bonus!  a door painted black won't show the grime as much as a door painted white!


While I was at it (this is why projects are never quick for me, I always find side projects) I opted to paint the lightswitch plates as well.  If your switch plates are cheap plastic ones like mine, you'll need to paint them with a coat or two of stain blocker (Kilz) before you apply the paint.  I painted several switch plates since I had the project going, but I still missed a few.  To paint the screws, I grabbed a box that was headed for the trash, punched holes in it, set the screws into the holes and painted them right on top of the box.  Much to the relief of my children (seriously - they were concerned), I didn't paint the switch plates black, but just the same color as the walls, so they blend in.


Before I embarked on this project, I found lots of inspiration on the internet, chief among them being Jennifer's painted doors at Dimples and Tangles.  She painted all her interior doors and they are show stopping gorgeous.  Seeing her front door beside the office door was the vision I needed to get myself going.  Click }here{ to see Jennifer's beautiful home.

 image source:  Dimples and Tangles

I also researched how to's, and followed Sarah's suggestion for how to paint doors }here{ at Thrifty Decor Chick - she has beautiful black doors, too!  Painting beveled doors is pretty basic, and yet there are nuances.  This post is really helpful for the order in which you'll want to paint the surfaces.

image source:  Thrify Decor Chick

Finally, I reviewed Allison's saga of her "Most Epically Horrendous DIY Disaster to Date" at House of Hepworth's.  Click }here{ - you've got to see it to believe it. It's a heartbreaker, but she shares her experience about using the wrong kind of paint with a great sense of humor.

image source:  House of Hepworths

If you're thinking about painting your interior doors, my advice is do it - you'll love the (possible domino) effect!  It'll never be 'just this one thing' for me when it comes to painting.  I can always find one a few more things to paint while I have the paint and brushes out, which is great, because after this weekend my perfect house is a about five projects closer to me, and a little further from infinity :o)

I'm sharing this post at the Thrifty Decor Chick July Before and After Party ... 
click below to see some fantastic before and afters!

TDC Before and After

Friday, May 8, 2015

Freestanding Kitchen Island Part Two: Granite Stone Top

When we built our house a few years ago, I hadn't thought much about how I wanted the kitchen to work.  I was all about making sure the paint color glowed when the sun went down (it does) and taking advantage of every possible opportunity to add windows (mission accomplished).  About the only thing I was sure of for a new kitchen was that I wanted a walk in pantry and a long counter to use as a buffet.  I also knew I didn't want an island.

Alas, it's four years later and I wish I'd considered a built in island.  Maybe someday I'll master woodworking and put together a true do it yourself, but for now, a free standing island from Amazon.com is a perfect solution.  I introduced this piece of furniture to you }here{ and it's been a great work horse already, except for one problem:  the wood scratches easily.  I was expecting that issue, thanks to honest reviews on Amazon, and there was a plan to deal with it before I clicked confirm on the order.


Occasionally, daydreams about upgrading our countertops pop in my head, but for now, we'll settle with a stone top for the freestanding kitchen island.  I like that the island is black, but as a whole it's a bit dark.  I wanted an easy to clean, scratch resistant stone surface that would coordinate with the existing counters and cabinets.  You know how it is when something is on its way to you and you can see the dots connecting way before it was even on your radar?  I noticed the Jubilee Company showroom in Princeton, Texas, on the way into town months before we were even shopping for an island.  When we decided we would definitely want to resurface the island with a stone top, I knew right where to go.


The Jubilee Company showroom will have you dreaming of beautiful kitchen and bathroom projects the minute you step in the door. I explained to Dan, our customer service representative, what we were looking for and he walked me through the display area full of   b e a u t i f u l  stone slabs in every color and pattern your heart could desire.


I wanted something to brighten up the surface of the island and blend with the color of the cabinets.  When I first walked by the stone I ultimately chose, I said, "That's really pretty, but it's not what I'm looking for." Of course,when I went back one more time to admire it, I couldn't deny it was the one. I guess this is how it will be when it comes to the kitchen:  I think I know what I don't want, then it turns out to be what I want :o)

Dan let me take a small sample with me, which I was so happy to have, since I'm pretty sure I would have second guessed my choice once I got home.  I chose "Revolutions" - a natural slab granite, and also opted for a beveled edge to complement the island's bevel.


Our gorgeous 24x42 custom slab was ready in about two weeks.  Delivery was an option, but since it's a manageable size, we were able to go by the showroom and pick it up.  It's a solid 120+ pounds, and definitely required two very strong young men to carry it (thank you Nathan and Caleb!).  All they had to do was carry it into the house, lay it down on the the island, and we had instant kitchen bling!


Ordering a smallish piece of granite gave me some budgetary freedom to choose what appealed to me the most; if I'd been looking for countertops for the whole kitchen, this choice would have stretched the budget.  I did learn that stone is graded in levels, and the more spread out a pattern is, the higher the level (and more expensive) it is.  Jubilee Company has levels 1 to 7 on site in their showroom and can custom order up to level 10.  The piece I chose is a level 7.  I'm glad there were no level 10's anywhere close.


Having been without a kitchen island, we now appreciate how great it is to have a dedicated work surface right in the middle, especially when there's lots going on.  And having lived for a while with a work surface that scratched easily, we now appreciate how great it is to have a resilient granite top that is so, so pretty.

Here's our journey from no island at all, to freestanding wood top, to granite:


I have a new love for gorgeous stone and everywhere I look I'm wondering if I could add a stone top. It might have been more budget friendly just to go ahead and do those kitchen countertops ....


If you're considering a project that involves natural stone, 
check out the Jubilee Company website }here{ ... it's full of information and beautiful ideas!

I'm linking up with Thrifty Decor Chick's May Before and After Party 
click }here{ to see lots of fabulous transformations!

TDC Before and After

Monday, November 7, 2011

Season of Gratitude: Before and Afters


Our front porch is one of my favorite places in the world.


It’s great for sitting. Or sittin’ – depending on the mood.

Our dear friends Kathy and Billy gifted us with mad money Home Depot shopping cards as a house warming gift. They didn’t tell us we had to buy porch furniture, but we've spent such lovely times with them on their front porch, we couldn’t think of using their gift for anything else.

I love these rocking chairs.

They rock.

But my favorite chair comes from before. Before the black furniture. It sticks out like a sore thumb. You can see it up there in the first picture ... not playing well with others.

But I love it. You can pull out the foot rest and recline ala Cleopatra. Or adjust the back for a better view of the stars. It's the wrong color, but it’s awesome.

Alas, my husband hates this chair. It sticks out like a sore thumb. Did I mention that?

I’ve been inspired by ThriftyDecorChick and her can-do spray painting fun (no pun intended ;o). And I've been eyeing that spray paint that says it bonds to plastic ...

Plastic? Really? The paint won't shred off? Can you paint plastic and it look good??

The instructions on the paint can say to agonize over painting for a minimum of four months, and greatly fear that you are sacrificing your most favorite chair ever to a project doomed to fail. Spray paint and plastic? Are you CRAZY? I'm kidding. The instructions say to prepare the surface. Which I did, by swatting at it with an old dishrag. And licking my finger to rub off a coffee stain.

Then I got right down to painting. Because precision is definitely NOT my middle name. Neither is patience. Once I get over the fear, that is.

My husband taught me to spray in short bursts. Like “Psssst! Pssst! Pssst!” As opposed to “pssssssssssssssssssssssssssssssssssssssssst!” as I was wont to do. When when you spray in short bursts and use even, smooth strokes, you are far less likely to get drips or globs. When I listen to my husband, things always turn out better. Don't ask me how I know that.

I thought the paint color was BLACK, but it is really grey. With little sparkly flecks. Like a car. Which is nice, because if my husband’s truck ever needs some body work, I can take care of it with my left over paint, applied in short "pssssst! psssst!" bursts.

I painted two coats, which only used up one can. It was EASY. And QUICK - 45 minutes or less from the time I made the first "psssst!" to when I was dragging it back to the front porch IN TRIUMPH! The spray paint covered extremely well - you wouldn't know it was a spray painted chair. Except maybe for the color, because would you really paint a lawn chair metallic shiney grey just like your husband's truck on purpose?


One of these days I’ll track down some plain black paint. But for now … whatever … my chair fits in better and is no longer in danger of being banished.


This is probably the lamest DIY before and after post EVER ... no, I did not transform a room from hospital sterile to sunny beach cottage using only items from Goodwill and Aunt Flo's attic. Yes, I spray painted a chair ... but if someone had told me that you really could paint a plastic lawn chair a completely different color and it would really look good ... it wouldn't have taken me so long to work up the courage to whip out the paint can. Even if it's not exactly the right color :o) If your plastic lawn chairs are looking drab or not fitting in, there is hope - just grab a can of spray paint that claims it bonds to plastic. It works!

Today I’m thankful for my favorite chair, transformed by a Before and After project. Ruby's thankful, too.


[beforeAndAfterButton%255B3%255D.gif]
Linking up with Thrifty Decor Chick's November Before and After Party!